
Adding & Managing Resources
Not sure how to add and manage resources within your app? No worries, we’ll show you how easy it is to add content in Devless! It’ll make creating your own app a breeze.

Devless Tutorial: Adding Resources
By the way, we’ve created this short video on adding and managing resources if you’d like to view it. It may not go into quite as much detail, but you may find it more interesting.
Either way, what are we waiting for? Let’s begin!
Adding Folders
First, let’s create folders for our app’s content.
Go to the ‘Home’ page in the dashboard. This is where you can add and manage your folders and resources.

To create your first folder, just click the plus (+) icon in the lower right and select ‘New Folder’.
In the window, name the folder and assign an icon. Next, select the appropriate color for its purpose then provide a brief description. Click ‘DONE’
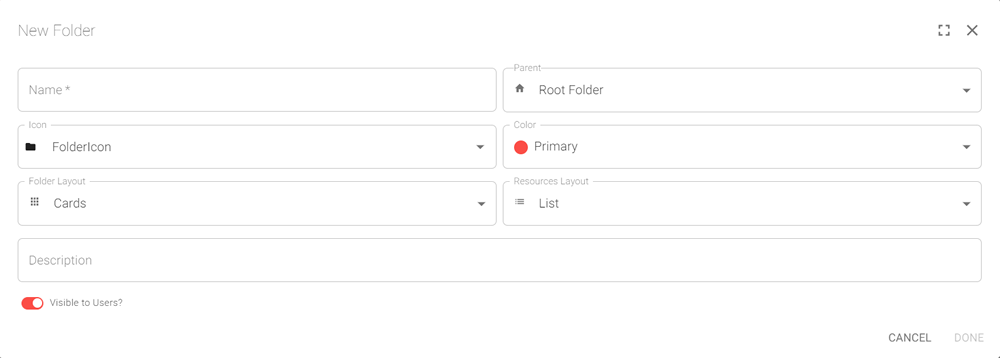
To create a sub folder, follow the same steps for adding a folder – with one additional step. You’ll need to select the parent folder it will belong to.
When folders and subfolders are added, they will appear on the home page and in the menu for quick access.
Additionally, at the bottom of this window is a toggle labeled “Visible to Users?”. When turned on, users can see the folder and all its resources. When off, the folder and its contents are not visible to your users.
Hiding folders is useful for creating a special place to store the resources that are used elsewhere in your app – like images, videos, docs, etc. This way, admins still have access to them, and your app is kept tidy for users.
As you can see, adding and managing folders is simple, but we don’t want to leave them empty! So, let’s add a resource to the new folder.
Adding Resources
Click the plus (+) icon located at the bottom of the home page again and select ‘New Resource’.
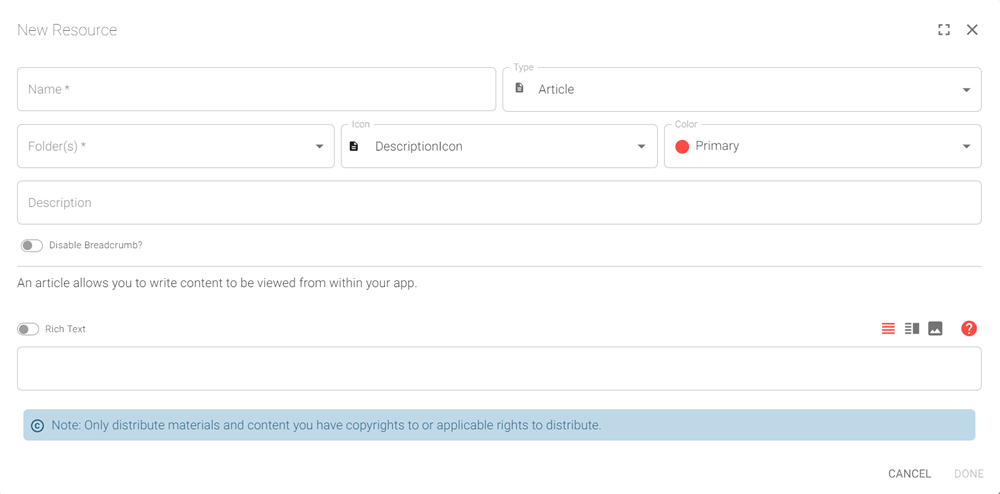
Name the resource and select its ‘Type’. There are many types of resources to choose from including embedded videos, PDFs, document downloads, articles, and more. If you’ve enabled some of our advanced add-ons, you’ll even be able to create some interactive resources. You’ll see them as options in this dropdown.
*You can learn more about the different types of resources, breadcrumbs, and layouts in this App Navigation & Homescreen document.
The types of resources you can make with the core version of Devless are:
- Article: The default type, this is a basic page of content that can contain rich text.
- PDF: Embeds a PDF in your app.
- Image: Allows users to open this image.
- File Download: Allows your users to download resources like special content or files.
- Video: Embed videos from YouTube, Vimeo, Twitch, and many other platforms.
- Contact: Add a contact screen to your app (people, organizations, or locations).
- Web URL: Either a button that opens a URL or embedded web page.
Keep in mind that these same resources can be used by some other add-ons/resources like support guides!
Next, you can assign the resource to a folder, or more than one folder making it even easier for your users to find content.
You can also set each resource’s icon, color, and description.
Below its description, you’ll see a toggle labeled “Disabled Breadcrumb?” which is on by default. By turning it off, you can make a resource feel more like a main “view” of the app instead of a resource that is a part of a hierarchy.
Now, let’s finish up by completing the fields specific to the resource type you selected. For example, if this was a video, simply provide the video’s URL. When finished, click ‘DONE’.
Congratulations, you’ve added content to your app!
Keep going, and before you know it, you’ll have an app rich with content that you can share with your team or customers. When you’re ready, just click the “View Your App” button to test your app and begin sharing.
For more Devless guidance, please check Help Center where we make app building super simple for everyone!